New meters

Back after a hiatus of a few months. The main reason can easily be guessed from the previous post! :-)

This time I will be talking about so-called "Smart meters" since both my antiquated electricity meter and gas meter were recently replaced.

Linky

Linky is the name for the French electricity smart meter. They are manufactured by different companies but all have exactly the same flashy green colour!
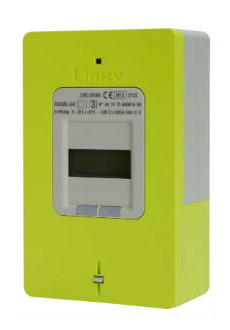
Smart Meter - Linky

Linky is highly controversial but not for the right reasons IMHO. Opponents seem to concentrate on false and bizarre statements about radiations when they don't assert the meter embarks a camera! Long term loss of job (meter reading people) and above all the risk of privacy breach (it is technically possible to know how much electricity is used in real time hence to know what are people's daily routine and/or if they are on holiday, etc...) could have been causes worth a battle. But honestly opponents only managed to discredit themselves and look like a bunch of lunatics!

Let's not forget that the original reason behind the arrival of smart meters is (by extension with smart grids) to be able to better handle the production of electricity by "green" means (wind, solar, ...) which are highly unpredictable and require to collect real time usage to try to balance production and consumption.

The fact you can now be charged with real amount rather than estimates and you don't have to be home any more to open the door is a real bonus too. Note that in France, contrary to some countries like the UK, you don't have a "smart energy monitor" in standard. This kind of display with the current consumption in currency seems to be given only to the poorest families. AFAIK there isn't any similar solution sold yet.

There is a slot for the emitter module ("ERL") and "Teleinfo" is available! Hurrah!

So my first task was to create a MQTT/Wifi module to transmit the real time data. I'll give all the information about it soon.

Gazpar

The smart gas meter is called Gazpar and is controversial too (obviously!). The transmission of information is slightly different. First it is only one-way and for reading: Nothing can be done remotely. Reading are transmitted by FM then mobile network twice a day.

It is like a old "dumb" meter clad in an bright orange cuirass.
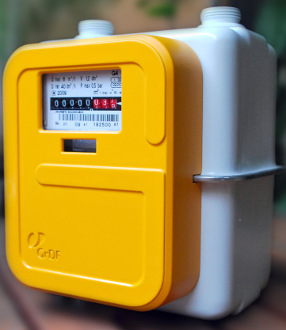
Smart Meter - Gazpar

For me the main issue is the loss of the magnetic pulse reading. I actually suspect that is is used internally by the Gazpar electronics but it is no longer available for personal use.

There is a "socket" but I can't find much information about how to use it (dry contact? Not so sure specially that the battery should last 20 years and in theory the fact that something is plugged in is sent to gas provider) and I am rather shy to try anything. If someone has any information about it... Please contact me.

The good news is that there is a shiny "6" on the litre digit so, reusing the old electricity light sensor, I am able to count the "pulses".
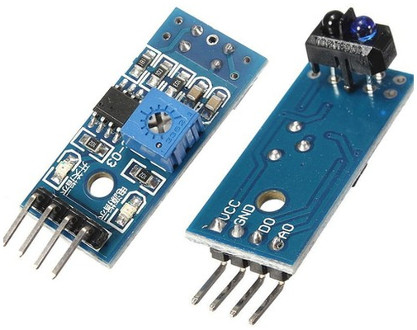
TCRT5000

Le compteur gazpar est équipé d'une prise. Cependant quasiment aucune information à ce sujet n'est disponible. Cela pourrait être un contact sec mais j'ai du mal à croire qu'il s'agisse d'un relais (avec une pile qui doit durer 20 ans et du fait que l'utilisation/occupation de la prise semble faire partie des informations remontées). Je suis preneur de toute information à ce sujet... Merci d'avance.

EDIT (16/12/2018):

The cable is for sale on (at least) two online shops. By the time you add VAT and postage, it's almost 20€ or 24€ (horrendous for what it is) but let's hope the price will go down with time.

Regarding how it is connected internally, I still haven't been able to find any documents but my best guess is that there are 2 reed switches bundled together, one used for the internal counter, the other one directly connected to the socket.
    Wifi with ESP8266 - Part 6

    This time, it is about playing with a ESP-201 as well as with the Nodemcu devkit but without nodemcu (the firmware). Here are a few notes about what I discovered while playing with these boards.

    Arduino

    As I mentioned in the past, starting with Arduino 1.6.4, there is now full support for ESP8266.

    Libraries

    A majority of the Arduino's functions are directly available to be used of the ESP8266 and some additional libraries have been directly developed specifically. The libraries and documentation are changing extremely fast: between my first attempts in the summer and now, a lot of material was added.

    Programming

    The biggest hurdle with these chips seems that timing. While a "normal" Arduino will happily wait for any kind of event to happen, the ESP8266 tends to reset very easily. Too easily maybe and I wasn't able to do some tasks such as the La Crosse decoder and its strict timings.

    There is more info about watchdog in the documentation and in this interesting blog entry about porting code from the Spark Core to the ESP8266.

    WIFI

    This is the whole point of these modules! If connecting is easy (at least in theory!), keeping the connection alive is a bit more of a challenge. Keeping a eye on the status is essential.

    Nodemcu

    The nodemcu devkit already mentioned here has 2 switchs: "RST" and "FLASH".

    But in practice, they are not used thanks to a clever system (See "USB TO UART" on the schematics)... Flashing mode and reset are done automatically!

    Debug with GPIO2

    Boot

    The second Serial output is something nice and not widely documented with ESP8266 modules: GPIO2 (aka pin D4) can indeed be used for debug purpose.

    For example on one of my modules, if I press reset, I obtain the following message:

    ets Jan  8 2013,rst cause:4, boot mode:(3,7)
    
    wdt reset
    load 0x40100000, len 29132, room 16 
    tail 12
    chksum 0x4c
    ho 0 tail 12 room 4
    load 0x3ffe8000, len 2888, room 12 
    tail 12
    chksum 0xf7
    ho 0 tail 12 room 4
    load 0x3ffe8b48, len 8, room 12 
    tail 8
    chksum 0xbf
    csum 0xbf
    

    Not extremely useful (except to check it is properly booting...) but there is more.

    Wifi debugging

    For example, on another module, here is the message when connecting to Wifi:

    scandone
    f 0, scandone
    add 0
    aid 1
    pm open phy_2,type:2 0 0
    cnt 
    
    connected with MYSSID, channel 3
    dhcp client start...
    ip:192.168.42.101,mask:255.255.255.0,gw:192.168.42.1
    

    Serial port

    Moreover, it is also possible to write from the programme to this serial port and it is very easy. As the Arduino documentation put it:

    To use Serial1, call Serial1.begin(baudrate).

    But you have to remember that you can only write (only TX exists).

    Connection

    Simply connect GPIO2/D4 and GND to a serial adapter. Speed settings should be 115200 8N1 but as usual with these modules, your mileage may vary.

    Different models of Nodemcu

    There are quite a few versions of breakout board, all more or less compatible. Below a selection of the most famous ones (I am not even including the clones):

    More information on this blog. Check also this one.

    And all this without even mentioning the new generation!

    Wifi with ESP8266 - Part 5

    In previous posts, I mentioned a problem with ESP8266 modules when using a Orange Livebox (the router let by my ISP). It was confirmed by someone else (thanks you Sébastien H.) that splitting into 2 SSIDs 2.4 Ghz & 5 Ghz and forcing all clients on the 2.4 Ghz helps.

    I also received a few queries about how I worked around this problem...

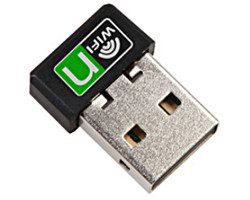
    Well, basically, I bought a Wifi dongle I installed on my Raspberry and created a new totally private network aside. It probably helps a tiny bit with security but it is a bit of a pain with kernels/modules as my dongle is not recognised with the standard kernel.

    An alternative could have been to use a cheap Wifi repeater/booster since most of them just create a new SSID bridged to the base network. The risk being this new bridge behaving like the Livebox.

    Help with a Wifi dongle on a Raspberry Pi

    Realtek RTL8188EU

    In theory, the process is straightforward:

    apt-get install -y hostapd firmware-realtek isc-dhcp-server iw
    

    See, for example, https://learn.adafruit.com/setting-up-a-raspberry-pi-as-a-wifi-access-point/install-software

    As indicated above, I have an issue with the default kernel module 8188eu... The Wifi dongle is only half recognised and doesn't initialise properly. Fortunately, a functional version can be found pre-compiled here: https://www.raspberrypi.org/forums/viewtopic.php?f=28&t=62371.

    • First, find the filename name in the list according to the dongle and the kernel version
    uname -a
    
    • Then the module can be downloaded for Raspberry P1 or P2 (look for dl.dropboxusercontent.com/u/80256631/8188eu-2015yyzz.tar.gz or dl.dropboxusercontent.com/u/80256631/8188eu-v7-2015yyzz.tar.gz on the page).

    • Once installed, all Wifi tools (and in particular iw ) should work properly.

    « Page 5 / 12 »